Starting a Tall Flag Team
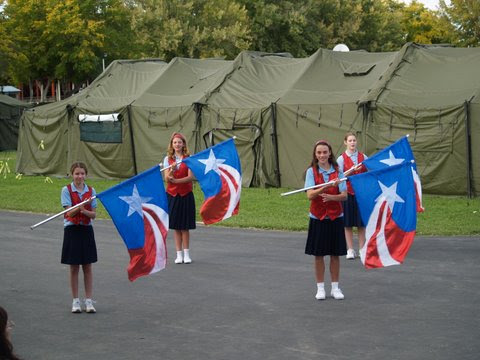
Tall Flag teams are a great way to keep older kids involved while offering a valuable service to your community. Tall Flag teams twirl 5 ft (or longer) flag poles to music and perform in parades, at community functions, for nursing homes, and for veterans organizations. Due to the height of the flags, tall flag teams are usually reserved for older participants although younger kids are welcome to participate if they can complete the routine or if you wish to make custom flags that are shorter.
If you have never twirled tall flag before, you will need to learn the basic moves and positions before learning a routine. The Colorguard Tutor is a great website to view video demonstrations of both basic and more advanced moves.
Colorguard Tutor –http://colorguardtutor.weebly.com/flag-basics.html
Before you can get started you will need to order your equipment. Flags and poles can be ordered from:
Band Shoppe: www.bandshoppe.com Click on their flags section. You may choose any flag that measures appropriately for the pole size you choose. We recommend 5’ poles so that as many kids as possible can participate, even if they are short. For a 5’ pole, you will need a flag that is 30” in height (flags should be ½ the height of the pole). Product recommendations are as follows:
1 – Aluminum 5’ flag pole or Fiberglass 5’ flag pole per person (aluminum gets very cold in the winter!)
1 – 6’ flag pole bag to store your flags in when traveling (optional)
1 – Practice Flag per person – cheap solid color
1 – Parade Flag per person – fancy patriotic colors or design. Be careful of buying close-out or clearance flags. If you get new members to your team, you may not be able to purchase matching flags. (If you are on a tight budget, simple practice flags can also be used in parades.)
You will also need:
1 – Loud battery operated amplifier stereo system. This can be strapped to a wheeled luggage carrier to pull during parades.
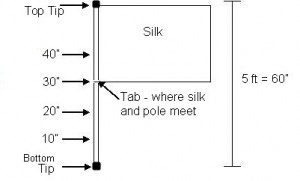
A diagram of a flag is shown below. In order to ensure proper hand placement, you can place cheater tape at the measurements noted. This divides your pole in half, and then the bottom half into thirds. Make sure that your tape is clear, or the same color as your pole, so that you can feel it, but an audience cannot see it.
Tall Flag Vocabulary
Tall flag vocabulary varies from region to region. Keep in mind that teams in your area may use different terms for the same moves or positions.
Backhand Catch -stopping equipment one handed, with the thumb pointed down toward the floor and the palm facing outward, away from the body
Carving – any movement that goes through the 45° planes. The most common movement utilizing this element is a hourglass/figure eight/witch’s broom (all the same thing, but the terminology varies by region)
Cheater Tape – pieces of tape added to the bottom part of a flag pole used as reference points for hand placement when teaching and cleaning routine.
Choke Grip – hand position where both hands are wrapped on the pole, palms toward one another and thumbs upward
Free Hand – The hand that is not actively engaged in manipulating the flag at any given time.
Money Hands – grabbing the pole palm up toward the ceiling, with the thumb pointed outward away from the performer’s body
Pitch – the angle of the pole relative to the person’s body. Flags may be spun horizontal, vertical or with some other pitch – often at a 45 degree angle
Sail – a term used to describe the problem when the fabric from the silk gets caught on the endcap of the flag pole. This often makes the flag feel heavier as the bunched fabric catches the wind like a sail.
Shoulder/Hip Angle – the pole crosses through the center of the body, with the tab at the hip and the pole crossing right at the shoulder (where the pole ends depends on the length of the pole, but it is generally going to be slightly above and to the outside of the shoulder). One hand will be at the tab, the other hand can be either at the bottom tip or the bottom cheater tape
Silks – another term to describe the fabric part of a flag
Tab – the center point of the flag pole where the flag and pole meet
Top Tip – rubber stopper on the top of the flag pole.
Bottom Tip – rubber stopper on the bottom of the flag pole (also called the butt)
Beginning Flag Moves and Positions
Right Shoulder – Place your left hand over the bottom tip, and your right hand grasps the flag at the tab. Depending on which trick you are doing, your right hand may be palm in/thumb up or palm out/thumb down. Your left hand should be directly covering your belly-button. The flag should be straight up and down and in the center of the body, in line with your nose. Depending on your height, you right hand should be just above or right at forehead level. Left Shoulder – This is the same as right shoulder, but the hands are switched. It is rarely used.
Drop Spins – Start at right shoulder with your right hand palm in, thumbs up. Take your left hand off the bottom tip and let it hang at your side. Move the flag counterclockwise until the flag is straight upside down. As you bring the flag down, also bring your right hand down. By the time you get your flag is upside down, your right hand should be in front of your belly button, right where your left hand used to be. Place your left hand flat in front of you with your palm down. Turn your hand 90 degrees clockwise until your thumb is pointing to the ground and your palm faces left. (Yes, it should feel awkward) . Keep your hand palm facing to the left (thumb down) and grab the pole. But you MUST grab below your right hand. Both thumbs should be pointed away from you. Take your right hand off and let it hang by your side. Keep the flag moving counterclockwise until it returns to being right side up. Grasp it again with your right UNDER your left.
Horizontal or Flat (Low/Eye/High) -. Low – Start at right shoulder and bring the flag down until both arms are completely extended downward. Your body should be between the 10” and 20” mark if you are using cheater tape and your arms should be on either side of your body at equal distances . Eye – the flag is parallel and directly in front of your eyes. High – the flag is extended above your head.
Present (Front/Back/Left/Right) – Front Present – start at right shoulder and push your right arm straight forward until it is parallel to the ground and completely extended. Bottom tip remains covering your belly-button.
Back Present – start at right shoulder and push your left arm straight forward until it is parallel to the gound. Right arm should be vertical above your head so that your arms are perpendicular to each other.
Left Present – start at right shoulder and push your right arm to the left until the flag pole is directly in front of your left shoulder. Bottom tip remains in front of your belly-button. Flag should be roughly at a 45 degree angle.
Right Present – start at right shoulder and bring your right arm to the right until the flag pole is directly in front of your right shoulder. Bottom tip remains in front of your belly-button. Flag should be roughly at a 45 degree angle.
Reverse Spin – Start at right shoulder with right hand palm out, thumbs down. Take your left hand off the bottom tip and let it hang at your side. Move the flag clockwise until the flag is almost vertical again (your right hand will feel very awkward and will begin to open). At the last moment, grab the pole with your left hand under your right and roll your right back to the starting position as the flag is straight up and down.
Slam (Right / Left/ Front )– Right slam, start at right shoulder and bring the flag down to the right until the top tip is pointing at the ground at roughly a 45 degree angle. The pole should make a line from your left shoulder through your body to right hip. Your right hand should be at your right hip and your left hand should be just above your left shoulder. A left slam is the same except reversed and starts at Left Shoulder. A Front SlamA Slam can either be quick (hence the name slam), or done in slow motion.
Slam Position – Right hand should be at the tab and the left hand at the bottom tip (as you would at right shoulder); all angles should be at 45°. On the right hand: right slam = flag will cross the body at a 45° angle, with right hand (tab) at right hip and left hand (bottom tip) slightly above the left shoulder; left slam = flag crossed at the opposite angle, with flag tucked under the right arm, right hand (tab) falls into left hand; front slam = right hand (tab) held out away from the body, directly in front of the belly button/waist area, left hand just above the forehead; back slam = right hand (tab) at waist level to the right of your body, left forearm crossed across forehead, left hand (bottom tip) above right shoulder. On the left hand: left slam = flag will cross the body at a 45° angle, with left hand (tab) at left hip and right hand (bottom tip) slightly above the right shoulder; right slam = flag crossed at the opposite angle, with flag tucked under the left arm, left hand (tab) falls into right hand; front slam = left hand (tab) held out away from the body, directly in front of the belly button/waist area, right hand just above the forehead; back slam = left hand (tab) at waist level to the left of your body, right forearm crossed across forehead, right hand (bottom tip) above left shoulder
Tall Flag Tips
1. Don’t Use PVC for your standard size flag pole. The inherent flexibility creates unnecessary strain on the wrist which could lead to injury. Purchase flag poles specifically designed for this sport.
2. Tape your rubber stoppers securely to your poles, otherwise the stopper may fly off and hit someone as the pole spins.
3. Try your warm-ups to music and mark time so that you can get used to listening for the beat and staying in tempo.
4. Do Spins in a straight line so that you can see when you are in or out of time with the other kids.
5. When spinning, try saying “Down, Up, Down, Up” or “1,2,1,2” to help keep yourself in time.
6. If your flag is slowly rolling up, you are probably twisting your wrists too much.
7. Make sure when doing drop spins that you always grab under your top hand. If you learn it wrong it is a very difficult habit to break.
8. Practice often. Tall flag takes more muscle than you might think. Start off with 50 spins from right shoulder and build up until you can do 100. As you learn new moves, practice them as well.
9. Make sure you spin at, or just above your waist (depending on your height). The higher up you try to spin, the harder it is on your arms.
