
In a world dominated by mainstream media, there’s something refreshingly authentic about the art of zine-making. Short for “magazine” or “fanzine,” zines are small, self-published booklets that serve as a powerful medium for self-expression and creativity. Earn your Zine Badge and delve into the fascinating world of zines, exploring their history, artistic significance, and the unique skills they cultivate. Badges you may wish to earn alongside include topics such as Book Binding, Communication, Writing, or Paper Crafting.
1. Brainstorming Zine Ideas
Zines cover a wide array of themes, ranging from personal narratives and poetry to social justice and activism. While creating your own zines is tons of fun, sometimes trying to decide exactly what your zine should be about can cause a bit of writer’s block. Brainstorming a list of possibilities will help you narrow your focus and decide upon a specific topic.
To Do: Create a brainstorming board. Use the chart below (click to enlarge) or create one of your own. In each square write down 5 different ideas associated with that category. For example, in the Personal square you might choose things like personal journal, favorite quotes, personal travel, etc. Nature could include ideas like zines on insects, trees, or flowers. Put issues you are passionate about in the Political square.
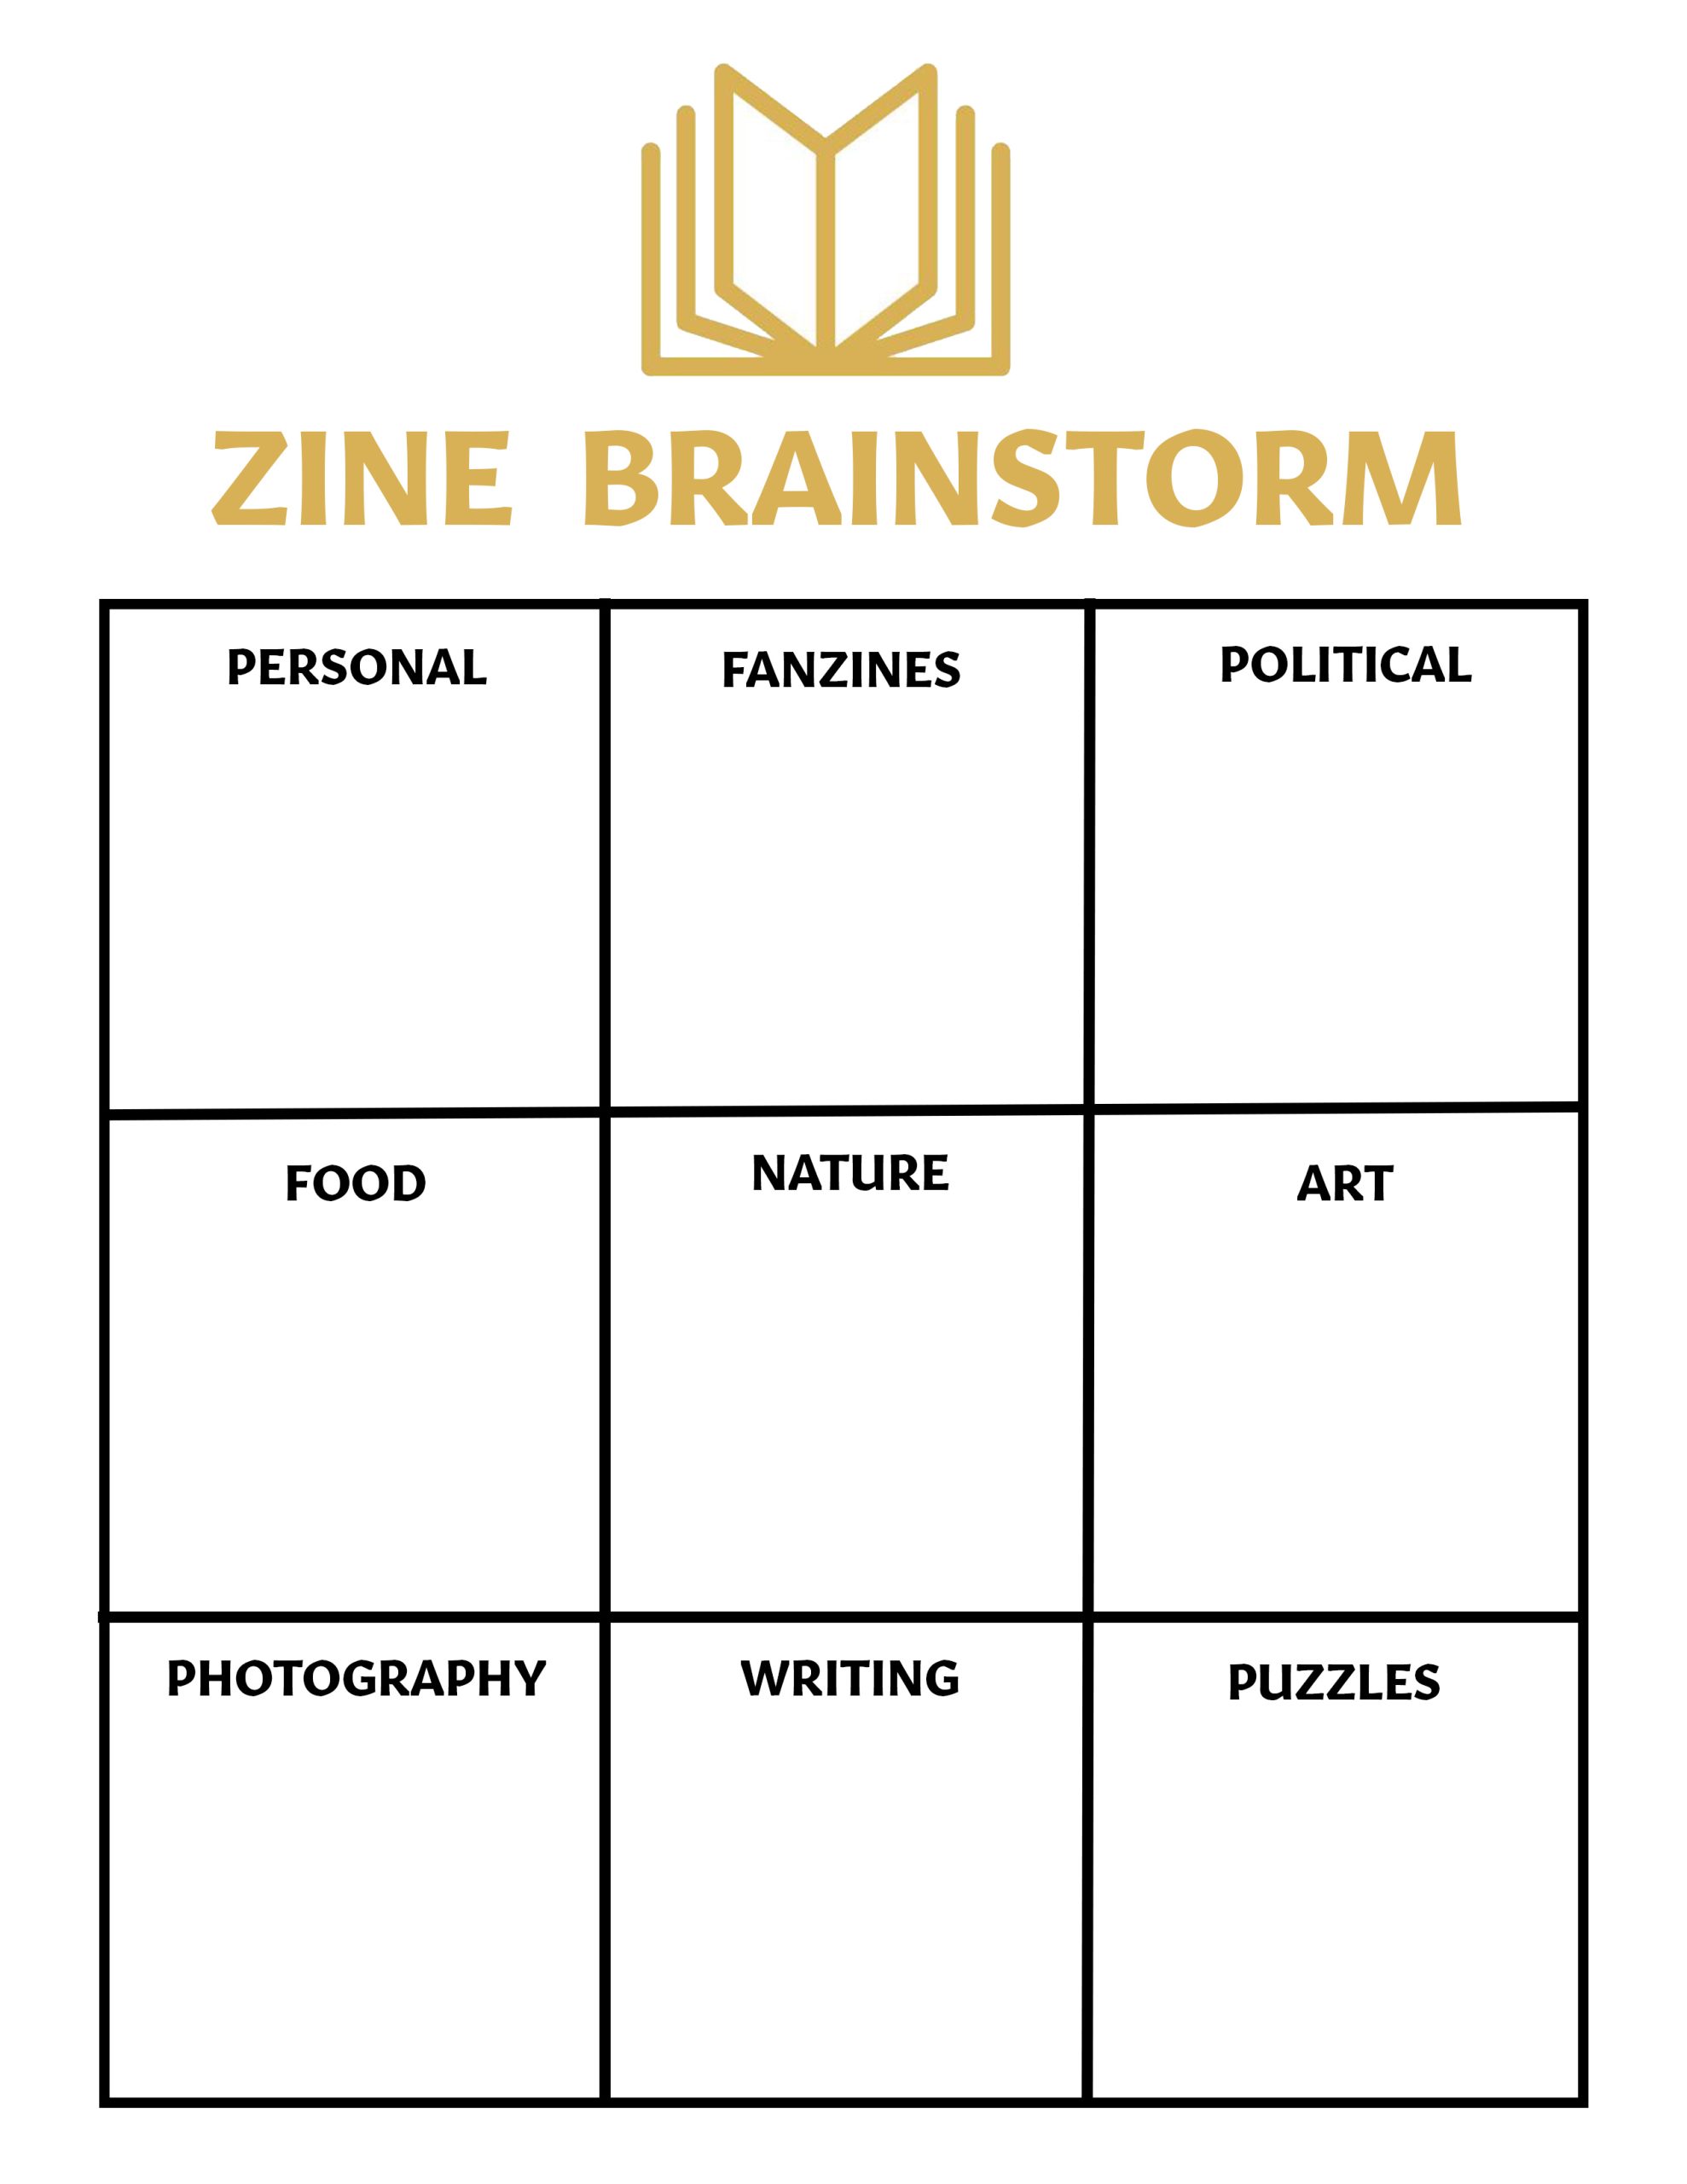
Fulfills optional requirement #9
2. Making a Basic 8 Page DIY Zine
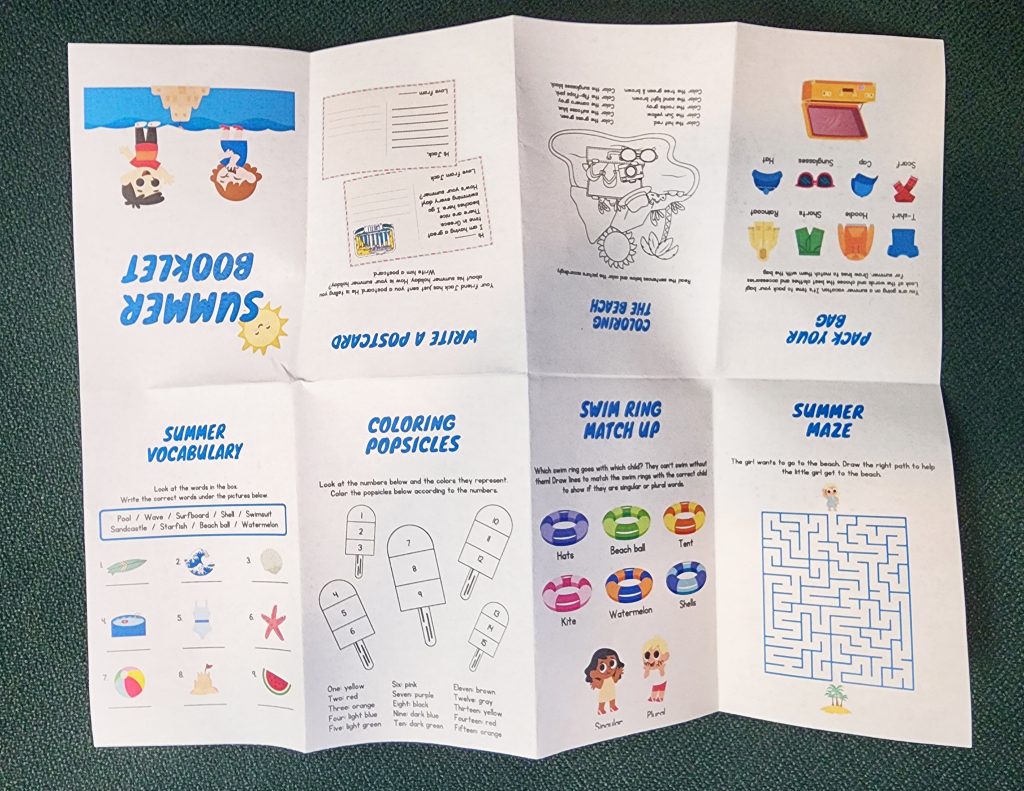
Creating your own zine doesn’t have to be time consuming or involved. You can make a simple 8 page DIY zine with one blank piece of paper and pen. Making their own zines allows kids to share their unique ideas, stories, and artwork in a personalized and creative way. Zines let kids explore their interests, communicate their thoughts, and connect with others in a way that feels authentic and creative. The simple method outlined below lets kids have full control of every aspect of a simple zine.
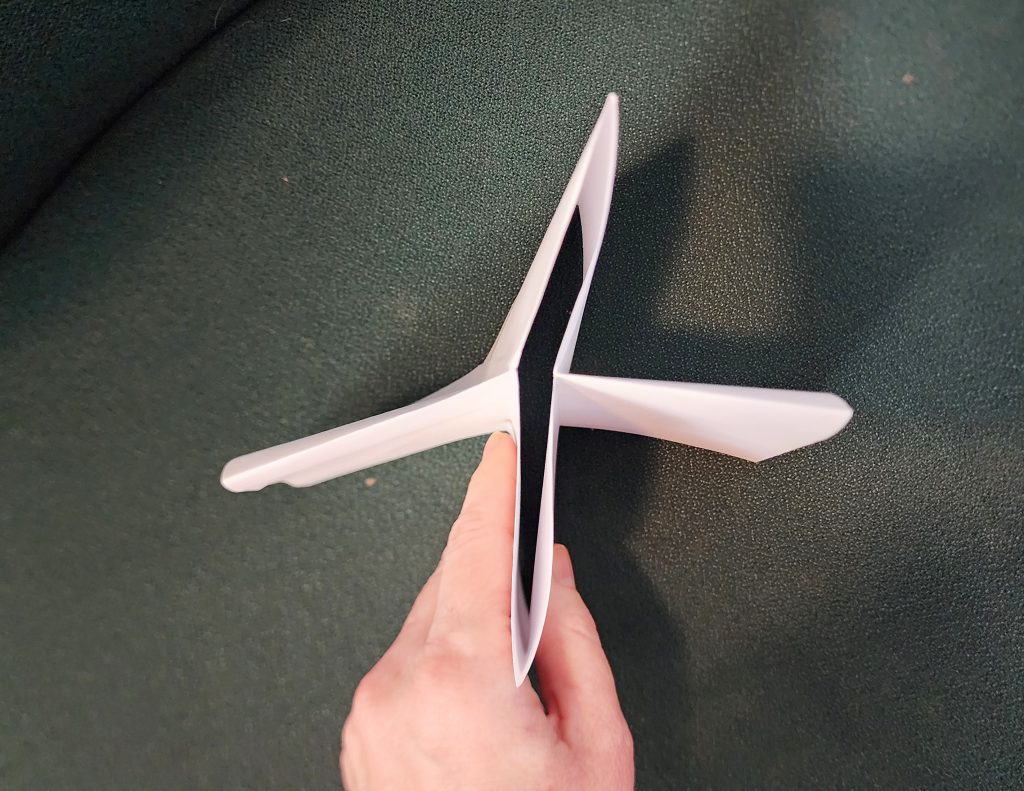
To Do: Make a simple eight-page zine with one piece of paper.
Materials:
- One sheet of 8.5 x 11 inch paper (standard letter size)
- Scissors
- Pen/pencil
- Optional: Markers, stickers, or any art supplies for decoration
Instructions:
Folding the Zine:
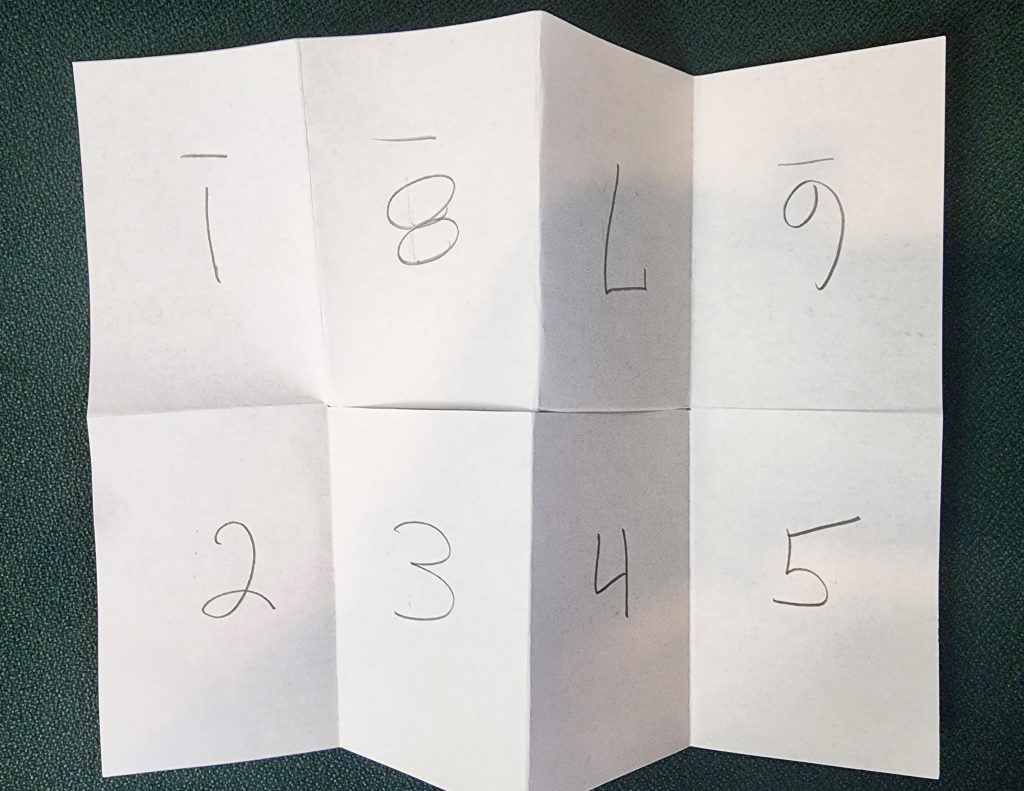
- Fold your paper in half, then in half again, and then one more time so that you end up with 8 equal rectangles.
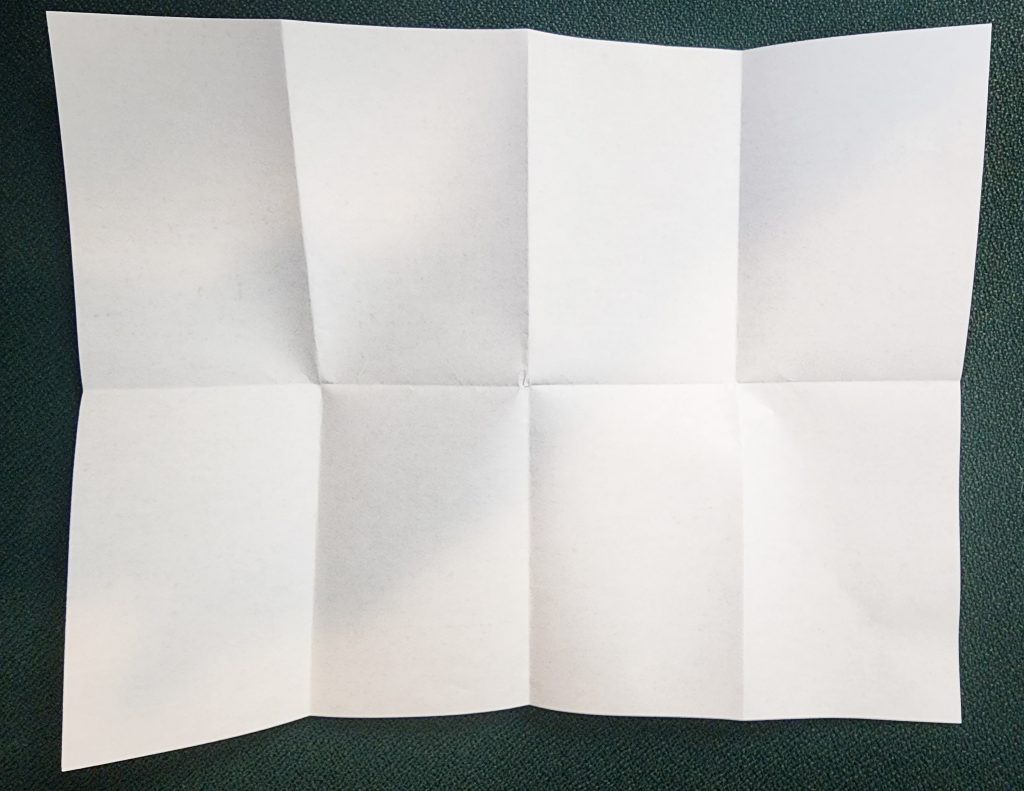
2. Open your paper until it is folded in half and 4 rectangles are visible. Cut from the fold to the center point.
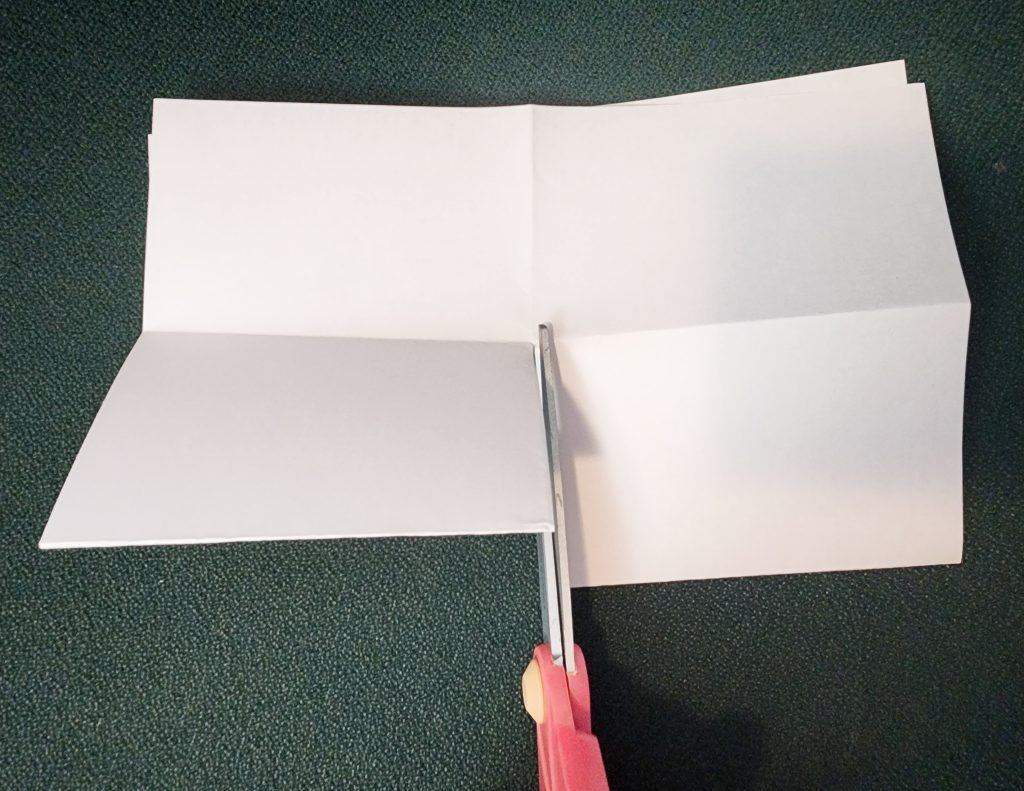
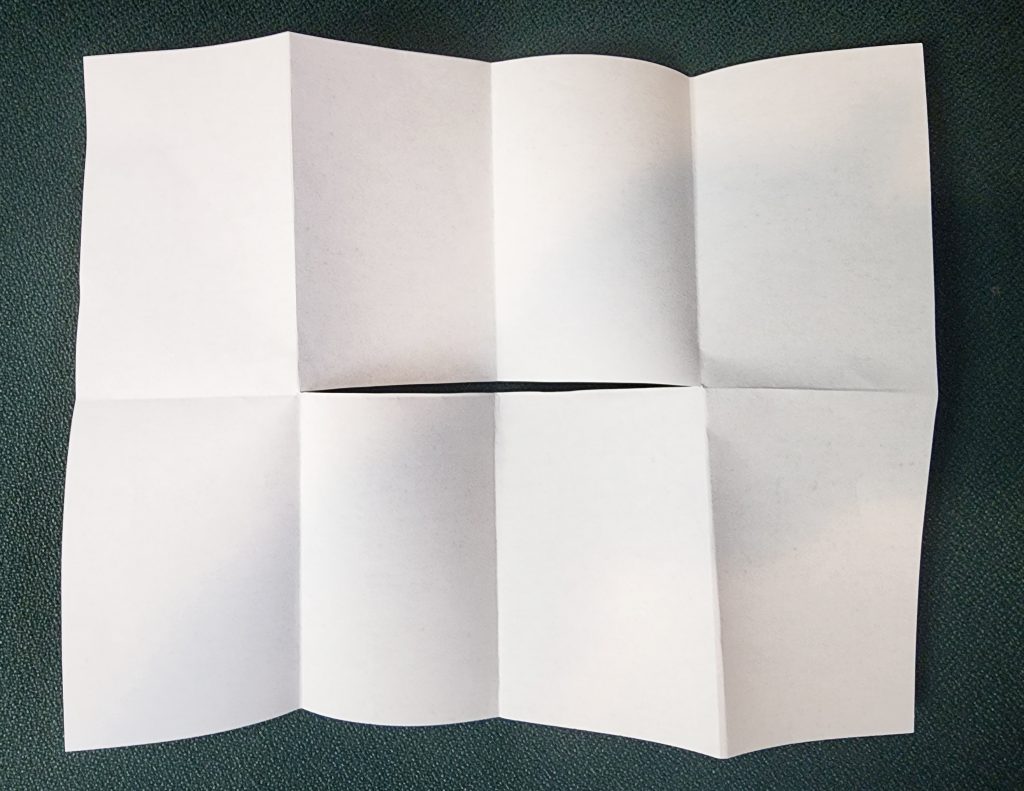
3. Unfold and then refold your paper in half lengthwise so that 4 rectangles are all in a line. Hold the paper on the ends and push toward the middle until you end up with what looks like a plus sign.
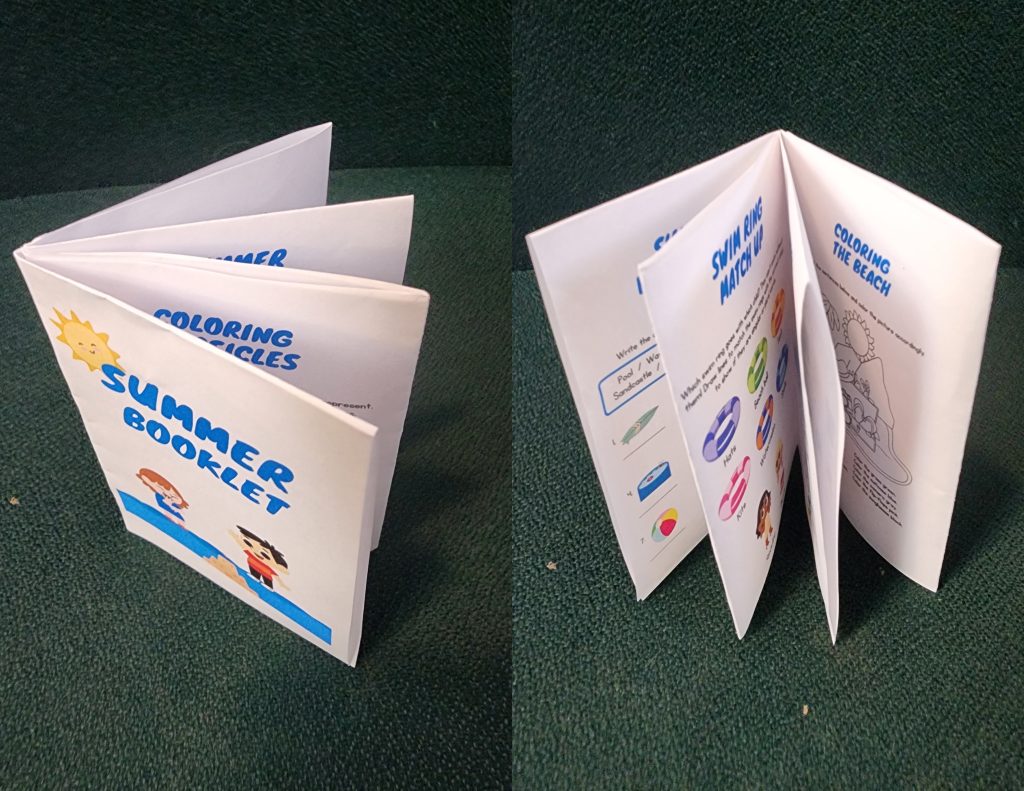
4. Fold all sections together to create a small 8 page booklet.
5. Decorate the outer sections (page 1 and page 8) as your zine cover and back. Get creative! Add drawings, titles, or anything that represents your zine’s theme.
Writing Your Zine
- Write short articles, quotes, etc. about your zine topic on the interior pages.
- If you are printing your zine from the computer, make sure the images on the top 4 rectangles are upside down so that they will be in the right direction once folded.
- Draw pictures, use stickers, or cut and paste images on any of the interior pages to help people understand more about your topic and to add visual interest.
- Zines can be all text, all images, or a combination of both.
Fulfills Level 1 requirement #2
3. Learn Zine Vocabulary
Many zines are more involved than the simple ones outlined above. They are printed and bound in many different ways depending on the size and distribution of the zine. Understanding industry terms is important when creating more advanced zines. Learning words like “bleed” and “CMYK” ensures clear communication in design, while terms like “POD” and “DIY” help navigate production and distribution. Embracing this jargon not only streamlines the creative process but also equips young creators with the language to explore and express their ideas effectively within the zine-making community.
To Do: Play a game of Zine Bingo and see who can get 4 in a row first. Use a website like My Free Bingo Cards to auto generate free 4×4 Bingo cards using the vocabulary words below – (just the words that are bolded). Print out all the vocabulary words with their definitions and cut them into strips. Place all the strips in a hat or bowl and pull out one at a time randomly. Read ONLY the definition, not the vocabulary word. Participants must know which word matches the definition and mark it on their Bingo Card. Check for accuracy before pulling the next word. The first person to get 4 in a row wins.
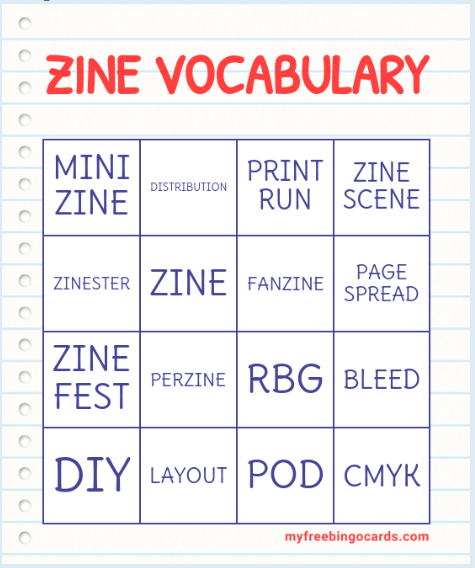
- Zine: A handmade book.
- Fanzine: A special book made by fans who love something a lot, like a favorite show or game.
- Perzine: A personal book where someone shares their thoughts and feelings.
- Layout: Arranging pictures and words in a book to make it look nice.
- Zinester: Someone who makes and shares their own books.
- Zine Scene: A group of people who love making and sharing books, like at events and festivals.
- Print Run: The number of copies made of a special book.
- Zine Fest: A fun event where people who make books come together to share, trade, and sell them.
- Page Spread: Two pages in a book that go together and look nice.
- Mini Zine: A tiny book made from just one piece of paper.
- Distribution: Sharing books with others by trading, selling, or giving them away.
- Bleed: Printing that extends off the edge(s) of a printed piece.
- CMYK: Cyan, Magenta, Yellow, and Key – used to create colors for printing
- RBG: Red, Green Blue – used to create colors for digital display
- POD: Print on Demand
- DIY: Do it yourself
Fulfills Level 2 requirement #2
4. Create Different Binding Techniques for Self-Publishing Zines
Exploring binding techniques adds an artistic touch to self-publishing zines. From the simplicity of saddle stitching or using staples for a clean finish, to the elegance of perfect binding for a professional look, the binding you choose will depend on many factors. Spiral binding offers flexibility for larger zines, while Japanese stab binding showcases cultural influences. Tailoring the binding technique to the zine’s size and theme not only enhances effectiveness, but also its visual appeal, contributing to a captivating and unique reader experience.
Binding Styles:
- Saddle Stitching: A simple binding where pages are folded and stapled together.
- Case Binding: A hardback binding where pages are folded, gathered, and sewn together. A case for them is then made by gluing and folding a printed sheet around 3 pieces of greyboard. Pages are glued into the case with end papers to form a case bound book.
- Japanese Stab Binding: A decorative binding using holes stabbed through the edge of the papers and sewn together using a decorative stitch.
- Spiral Binding: Multiple holes are punched along the edge of the papers and a wire is spiraled through them to hold the pages together.
- Comb Binding: Similar to a spiral bind but using a plastic or metal “comb” whose rings pass through rectangular holes.
- Perfect Binding: Used most often for paperback books. Thermal glue is applied along the spine of the cover and pages are glued in place.
- Interscrew Binding: Most often used for documents or scrapbooks. Holes are punched along the edge of the pages as well as two covering boards. When stacked they are secured with binding screws.
- Sewn Binding: Thread is sewn through folded pages at the spine.
- Section Sewn Binding: Folded pages are sewn in sections along the spine and then the sections are glued together.
To Do: Make three zines using a different binding technique on each. The Saddle Stitch below is the easiest binding technique to start with.
Saddle Stitch:
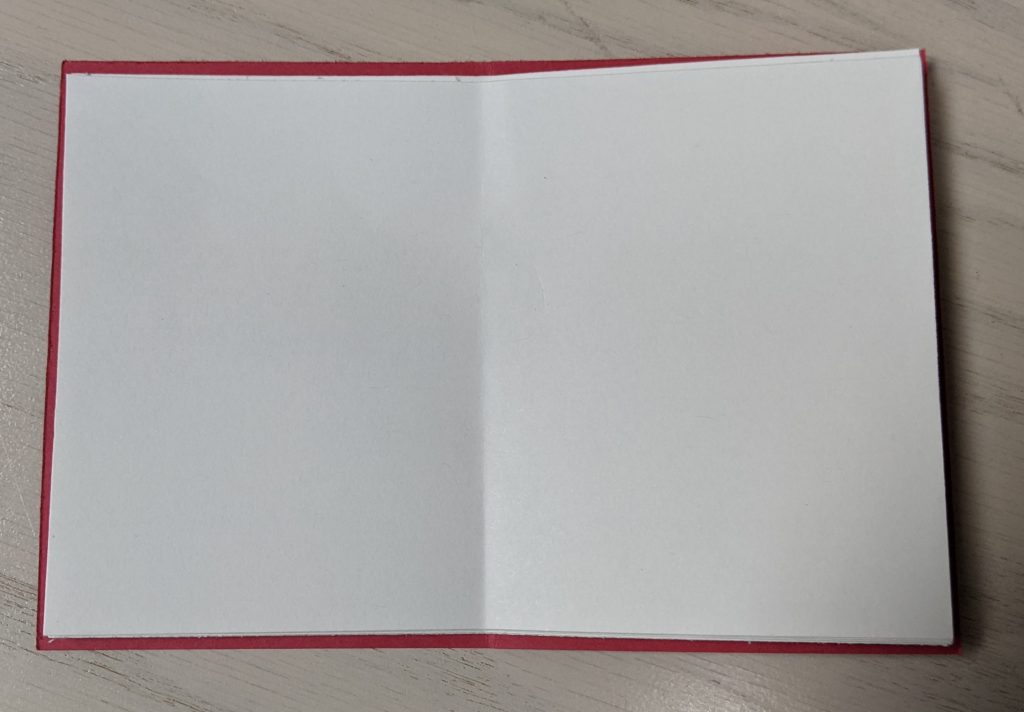
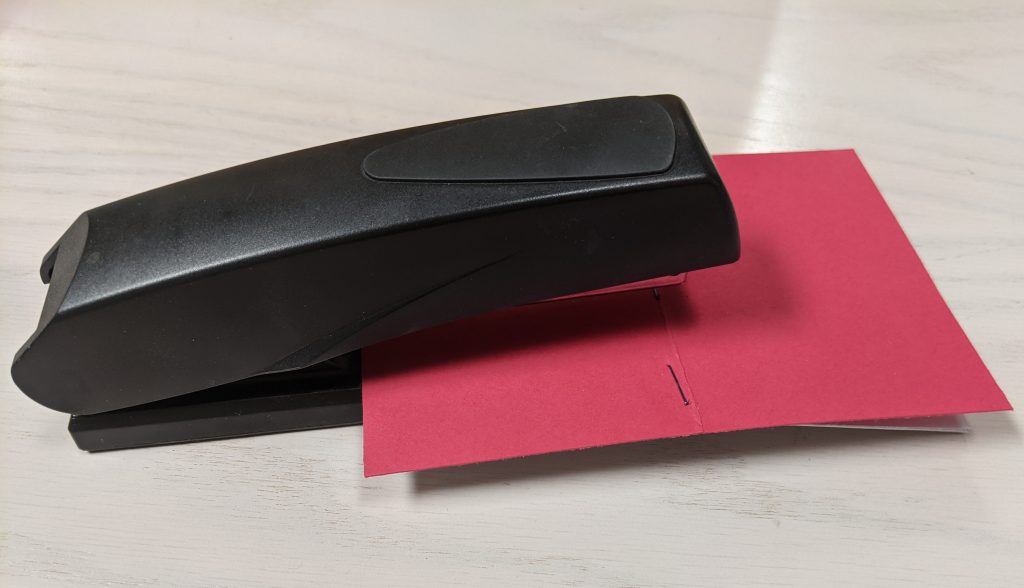
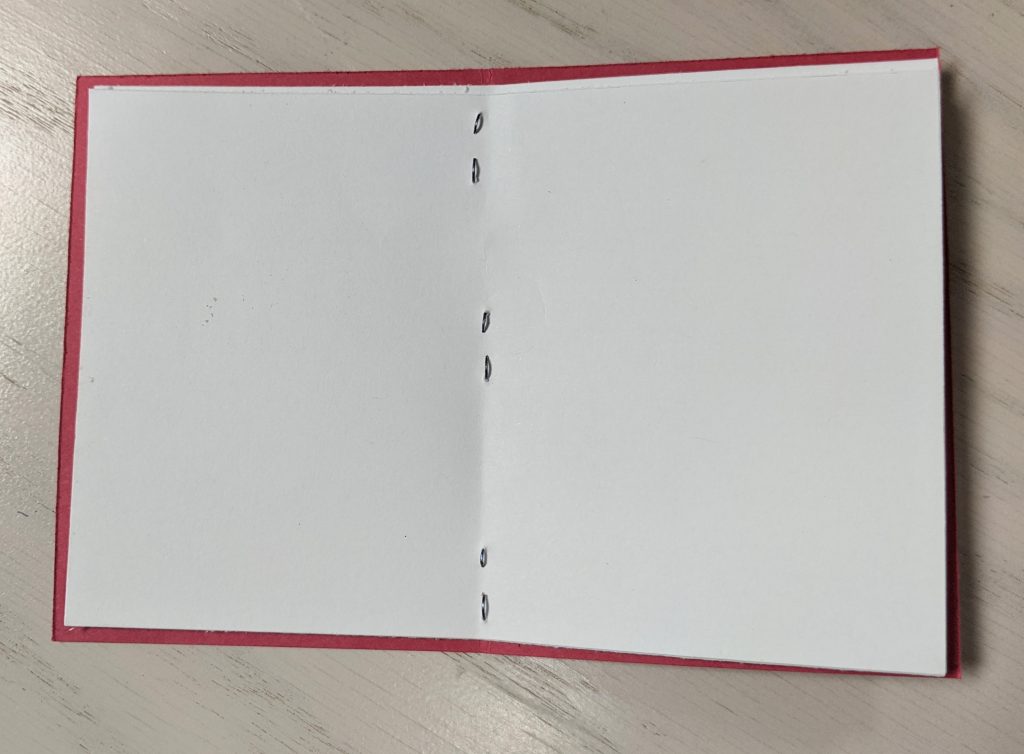
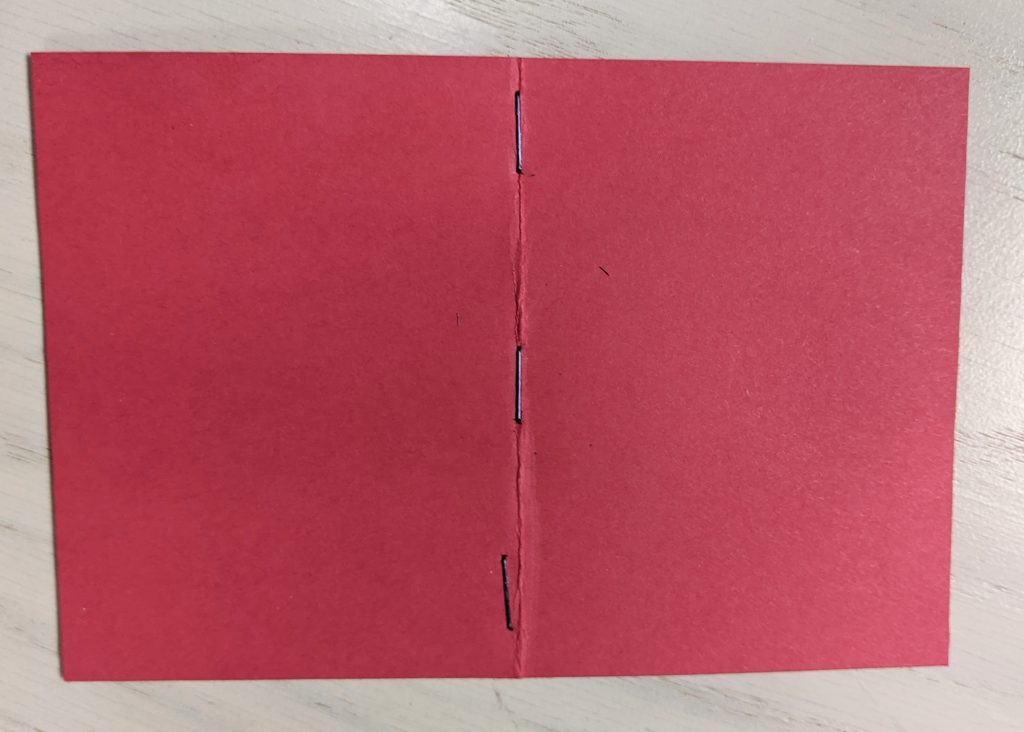
- Cut a piece of heavy cardstock (or file folder) to 6″x 4″. Fold in half and then reopen so you can see the center crease.
- Cut 10 sheets of blank paper to 5.75″ x 3.75″. Stack the sheets, fold in half and reopen so you can see the center crease.
- Place the cut sheets on top of the cardstock, lining up the creases. You should have a small even border of cardstock showing around the sheets.
- Staple along the spine (creases) with three staples, one in the center and one to either edge. The staple should run in the same direction as the spine.
- Fold your booklet in half and then decorate the cover.
Fulfills optional requirement #12

5. Oulipo Techniques for Writing Zines
One aspect of writing that can spark creativity for many is delving into the world of Oulipo techniques. The term “Oulipo” originates from a group of imaginative French writers who harnessed creative and contrasting writing methods to push the boundaries of what literature can achieve. As students embark on their Zine Badge adventure, they can infuse their zines with the magic of Oulipo.
To Do: Use one or more of the following Oulipo techniques for the writing in your zine
- N+7: Replace every noun with the seventh noun that follows it in the dictionary.
- Lipogram: Writing without using specific letters. This technique encourages inventive expression and unique linguistic choices.
- Univocalizm: Only one vowel may be used.
- Stile: Start each new sentence in a paragraph from the previous word or phrase in the last sentence.
- Definitional Literature: Words of a chosen text are replaced with their dictionary definitions.
- Snowball Verse: Each line consists of a single word where the following word should be one letter longer than the previous, creating a captivating snowball effect.
- Cut Up: Take a text or multiple texts, cut them into sentences or words, shuffle them up, and rearrange them in a new and exciting way.
Fulfills optional requirement #9
6. The History of Self-Publishing and Zines
Zines, born in the science fiction fandom of the 1930s, have evolved into a dynamic subculture. The 1960s saw underground comix and feminist zines challenging norms, while punk zines exploded in the rebellious 1970s. The ’90s Riot Grrrl movement empowered women through zine creation. Today, zines persist as powerful tools of self-expression, activism, and community, showcasing the enduring spirit of independent publishing.
To Do: Make a timeline zine about the history of zines. When researching zine history, be aware that many zines are not appropriate for young children so adults should supervise which zines are read.
Use one of the bookbinding methods above to create a timeline zine where each page represents a period or event in zine history. Your zine should have a minimum of 10 events but may include as many as you like. How you style your zine is up to you. It can be text based, telling about each event, or image based with images of popular zines during that time frame to mark the events instead. Feel free to get creative.
Duke University has a fantastic page with a timeline of zine and self-publishing events. This site also gives examples of a variety of zines during various times that you can research to find images. Cornell University also has an entire Zines 101 section on their website with a variety of resources including a section on history and culture of zines. Keep in mind these are college level websites so not all material may be age appropriate for younger children.
Fulfills Level 3 requirement #2 and optional requirement #4

7. Printing Options
When it comes to bringing zines to life, creators have a plethora of printing options. Traditional methods include photocopying for a DIY aesthetic or offset printing for a professional finish. Digital printing offers versatility for small batches, while risograph printing adds vibrant, textured charm. Choosing the right print option to match your unique vision and style will bring your zine to life.
To Do: Visit a local print shop. Find out what print options are available. What different paper types are available? How does the weight of the paper affect the finished product? How would printing on the various colors available affect the theme of your zine? What about textured papers like linen? What sizes can you print? What bindings are available?
